![]()
![]()
![]() Google© map configuration
Google© map configuration
The settings you make in this section govern the general configuration and usage terms settings.
Google Terms of Use Check: You must read and agree to the terms of use in order to use the Google© Map feature. Click on the View Terms link to see the terms of the agreement. If you agree to the terms, check the ![]() checkbox to indicate your acceptance.
checkbox to indicate your acceptance.
License Key: Enter a License Key, if you have one. A License Key is only required if your Maps API usage exceeds Google's usage limits (25 000 map loads per day; non-profit organizations are exempt). If you require a license, click the Get a License link to generate a license for your web site URL. In order to get a License Key, you must have a Google Account. Below are the links for getting an account and creating a license key:
Create a Google Account
Create an API Key
Once you have an API key you can copy the key (it is a very long string of numbers and letters) into the License Key field.
Center of Map Latitude: If you are going to be placing numerous markers on your map, you should probably just leave this as is and use the Dynamic Constructor section to build your center point. If you only want a single marker on your map, enter its latitude and it will be come the center point of the map. If you use the numbers suggested in brackets, the map is that of the entire United States. Need help finding the latitude?
Center of Map Longitude: If you are going to be placing numerous markers on your map, you should probably just leave this as is and use the Dynamic Constructor section to build your center point. If you only want a single marker on your map, enter its longitude and it will be come the center point of the map. Need help finding the longitude?
Zoom Level: If you are going to be placing numerous markers on your map, you should probably just leave this as is and use the Dynamic Constructor section to set your Zoom Level. If you only want a single marker on your map, you will probably want a Zoom Level of 6-8. The default zoom level when you first create the page is 13 which is 500 km to the inch. The smaller the zoom number the closer in the image zooms. For example, 2 is 200m to the inch.
Info Message: When users first land on the Google Map page, an information box is displayed on the center point of the map (the location you entered in the Latitude and Longitude fields). Use the Info Message field to enter the information you want displayed over your map's center point. For example:
Enter this:

to display this:
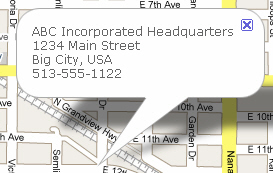
Notice that the use of </br> places a break in the line and single spaces the text whereas the </p> double spaces the lines of text.
Show Message: Check this box to display the message you entered in the Info Message field. When unchecked, the information message is not displayed on the published map page, nor is any marker.
Map Height: Enter the desired map display height in pixels. The default is 480px high. How this appears on the published page depends on your monitor's resolution.
Map Width: Enter the desired map display width in pixels. The default is 675px wide. How this appears on the published page depends on your monitor's resolution.
Include Navigating Buttons and Zoom: Check the box to allow users to navigate (move around) your map. When you include these buttons, you have three choices of which ones to include as displayed below: Large Pan/Zoom, Smaller Pan/Zoom, Small Zoom.
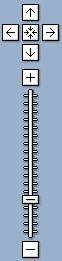
![]()
![]()
Include Type Selector: Google Maps allow different types of visual display. You can view the map as a basic street map. You can also view the map as a satellite image showing an actual photographic display of the terrain. Or you can elect a hybrid which is the Satellite image with main streets superimposed over it. Check this box if you want map users to be able to view these different types of map displays. There are two sizes of selector you can choose from. Which one you choose will depend on how big your published map is. You can use the larger or small selectors as illustrated below:
Large Selector - ![]()
Small Selector - ![]()
Scale Ruler: The scale ruler indicates how many kilometers per inch are represented on the map. You can choose to display or not display this item. It comes in 3 sizes: Wide, Standard and Short as illustrated below:
Wide ruler - ![]()
Standard ruler - ![]()
Short ruler - ![]()
Include Category Selector: DO NOT check this box unless you are going to use Categories. Read the following if you want to know how categories are used on the map page.
Check this box if you wish to display the list of categories that the user can choose from when viewing map points on your map. Once they select a category, all points assigned to that category are displayed. For example, if your organization has a number of Racquet Courts and Swimming Facilities at different locations, you could create a category for Racquet Courts and another category for Swimming Facilities. Then a user who wanted to see where on the map all of your Swimming pools were located, the could click on the Swimming Facilities category and markers would be displayed on the map indicating where the pools were.
When you include the category selector, you must also configure Map Points (locations where markers will be displayed) and Map Categories (the names of the types of locations - e.g. Racquet Courts, Swimming Facilities, Ice Rinks).
The Category Selector is displayed at the bottom of the Google Map on the published page. It appears as follows:
Category Selector: ![]()
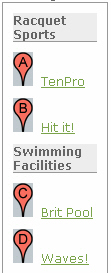
Note: This is a different category display feature than the Legend. The legend also displays categories but you cannot select to display some and not others. The Legend will list all categories and show which map points are assigned to each category. Here is what the Legend looks like with its Letter Points for map points and the Name of each map point displayed beside the marker.
![]()