![]()
![]()
This topic describes how to use the Document Manager page once it is configured and published.
The top portion of the published Document Manager page contains any text, images and instructions or other information that was entered into the Introduction HTML window in the edit mode of the Document Manager page.
When users first view the page, the default display as configured in the View Mode Properties section of the page. A list of all folders the viewer has permission to view is displayed. This permission is based on the asset domain restrictions enforced on a by-user basis.
Search features
A keyword search is displayed below the Introduction. Users can search All (meaning search for the keywords in all fields), search in current folder, search through document contents. If a user does not specify to search document contents, the system limits the search to the asset title, the asset's Alt tag, the asset description and any additional tags that have been applied to the asset.
Case Link
To the right of the Search fields there is a link icon that you can use to create a dynamic link to this case. The link can be pasted in electronic documents or on other web pages. Users can click the link to jump to this case. Click on the ![]() icon and a line with the link URL is displayed. You can copy and paste the case link to another page.
icon and a line with the link URL is displayed. You can copy and paste the case link to another page.
Document Manager Toolbar
![]()
The options on the above toolbar allow you to move assets to another case folder, download assets to save or print, merge assets into a single PDF file for downloading or printing, and Add single or multiple assets to the case folder.
Documents
The documents are displayed with their information listed in the default order configured on the Document Manager page. Users can click on a column header to resort the results by that column of information.

The yellow pencil located under the hand in the above image is used for editing the name of the case. To change the name, the ![]() and type in a new case name.
and type in a new case name.
To view the contents of a case folder, click on the Name link (1373-Test Subject in the example above).
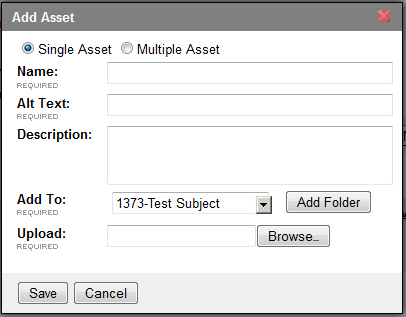
Upload Asset/Multiple Assets
When a user has the correct permissions, either defined by the asset domain permissions or as a document administrator for the pagetype, they can upload assets to the permissible folders. Uploading assets is done by clicking the Add button on the toolbar. An asset upload page is displayed similar to the following:
Upload single asset
Upload multiple assets
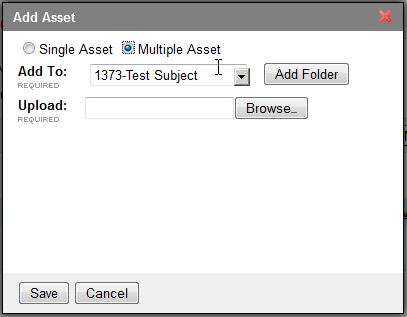
The Upload field will require that you browse to a zip file that contains the collection of assets you wish to upload.
The upload process is an asynchronous process meaning that the user is able to continue to use the rest of the Document Manager page features while the upload takes place. Assets that are being uploaded are displayed by name, with their names greyed out (so they cannot be clicked or downloaded) until they have been completely uploaded.
View History
A user with the correct permissions can view the historical versions of an asset if there is more than one version. The Version column displays the current version number as well as a (History) link that viewers can click on to see a version history.

Each version is downloadable and displays the date and time of the update to the file.
![]()